Layout
You can't go far in Doodle without needing to position pictures, and the Layout algebra provides a flexible way to do this.
Above, Beside, and On
The most basic layout methods are above, beside, and on. They do what their names suggest, putting a picture above, beside, or on top of another picture. Here's an example.
import doodle.core.*
import doodle.java2d.*
import doodle.syntax.all.*

val circle =
  Picture.circle(100).strokeColor(Color.blue)
val square =
  Picture.square(100).strokeColor(Color.darkBlue)
val triangle =
  Picture.triangle(100, 100).strokeColor(Color.crimson)

val basicLayout =
  circle.beside(square).above(triangle).strokeWidth(5.0)
This creates the following output.

As a convenience, there are also methods below and under, which are the opposite of above and on respectively. That is, a.above(b) == b.below(a) and a.on(b) == b.under(a)
Bounding Box and Origin
To understand how layout works we have to understand bounding boxes and origins. Every picture has a bounding box and origin. The bounding box defines the outer extent of the picture, and the origin is an arbitrary point within the bounding box. By convention, the built-in shapes and paths have their origin in the center of the bounding box. However, you can position the origin anywhere you want, either by creating your own paths or using the at and originAt methods described below. If necessary, the bounding box will expand to include the origin.
We can see the bounding box and origin using the debug method. In the example below we draw a circle beside a pentagon. We first display the bounding box and origin of the circle and pentagon separately, and then the bounding box and origin of the combined picture.
val circle = Picture.circle(100)
val pentagon = Picture.regularPolygon(5, 30)

val debugLayout =
  circle.debug
    .beside(pentagon.debug)
    .above(circle.beside(pentagon).debug)
This shows how the basic layout works: using beside horizontally aligns the origins of the two original pictures. The combined picture has a bounding box enclosing the two original boxes, with an origin in the middle of the line joining the two original origins. Above works similarly, except the alignment is vertical, while on simply places the origins at the same location.
Coordinate System
The origin defines a local coordinate system for each picture, with the origin always at the point (0, 0). The meaning of the units used by the coordinate system is backend dependent, but they usually correspond to pixels. That is, a point (10, 10) is usually 10 pixels right and 10 pixels above the origin. Note that Doodle uses the normal coordinate system, so x increases to the right and y increases up the screen, not the archaic coordinate system sometimes used in computer graphics where y increases down the screen.
Repositioning the Origin
Changing the location of the origin is the key to creative layouts. There are two methods that do this:
at, which changes the location of the picture relative to the origin; andoriginAt, which changes the location of the origin relative to the picture.
As you can see from the description, the two methods are opposites of one another. Let's see an example of use.
val atAndOriginAt =
  Picture
    .circle(100)
    .at(25, 25)
    .debug
    .beside(Picture.circle(100).originAt(25, 25).debug)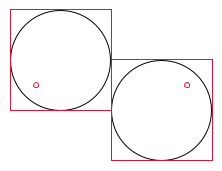
When you want to position pictures at arbitrary locations, a common pattern is to use at and on. For example, here we position five shapes at the points of a pentagon. This also demonstrates we can use polar coordinates with at.
val pentagon =
  Picture
    .circle(10)
    .at(50, 0.degrees)
    .on(Picture.circle(10).at(50, 72.degrees))
    .on(Picture.circle(10).at(50, 144.degrees))
    .on(Picture.circle(10).at(50, 216.degrees))
    .on(Picture.circle(10).at(50, 288.degrees))
Positioning using Landmarks
For many layouts it is more convenient to express points as a proportion of the distance to the edges of the bounding box.
We can do this with a Landmark. For example, we can specify the top left of the bounding box by simply using Landmark.topLeft instead of working out the coordinates of this location. Both at and originAt support landmarks.
In the example below we use Landmark.bottomRight to position five circles. This is easy using landmarks, but would involve some tedious calculations to do without. Notice that we use at, so that the circles appear below and to the right of the origin. Had we used originAt we'd have the reverse.
val bottomRight =
  Picture
    .circle(20)
    .at(Landmark.bottomRight)
    .on(Picture.circle(40).at(Landmark.bottomRight))
    .on(Picture.circle(60).at(Landmark.bottomRight))
    .on(Picture.circle(80).at(Landmark.bottomRight))
    .on(Picture.circle(100).at(Landmark.bottomRight))
We're not restricted to a few predefined landmarks. We can create landmarks by expressing coordinates as percentages relative to the edge of the bounding box. Zero percent is the origin, while 100% is the top or right edge of the bounding box for x and y coordinates respectively. Similarly, -100% is the bottom or left edge of the bounding box. Values over 100% are fine, and will cause the bounding box to expand to accommodate them.
Here's a variation of the above example where we position the origin in the middle of the top left quadrant of the bounding box. This is easy to express using landmarks: we simply use Landmark.percent(-50, 50). The x value of -50% means halfway towards the left edge of the bounding box, and the y value of 50% means halfway towards the top edge of the bounding box. Notice how using originAt has the opposite effect to at in the example above.
val landmark = Landmark.percent(-50, 50)
val quadrant =
  Picture
    .circle(20)
    .originAt(landmark)
    .on(Picture.circle(40).originAt(landmark))
    .on(Picture.circle(60).originAt(landmark))
    .on(Picture.circle(80).originAt(landmark))
    .on(Picture.circle(100).originAt(landmark))
We can also express landmarks in terms of Doodle's units, rather than percentages, using the Landmark.point constructor. In this case a landmark functions just like a normal point passed to at or originAt.
Finally, we can create a landmark from a mixture of a percentage value and a point. To do this requires providing the x and y coordinates as instances of Coordinate. The example below shows this.
val percent50 = Coordinate.percent(50)
val percentMinus50 = Coordinate.percent(-50)
val point50 = Coordinate.point(50)
val pointMinus50 = Coordinate.point(-50)

val overlappingCircles =
  Picture
    .circle(100)
    .originAt(Landmark(percent50, pointMinus50))
    .on(
      Picture
        .circle(100)
        .originAt(Landmark(percentMinus50, pointMinus50))
    )
    .on(
      Picture
        .circle(100)
        .originAt(Landmark(percent50, point50))
    )
    .on(
      Picture
        .circle(100)
        .originAt(Landmark(percentMinus50, point50))
    )
Adjusting the Bounding Box
Adjusting the size of the bounding box is another tool for describing layouts. There are two ways to do: we can use size to specify new dimensions for the bounding box, or margin to specify an adjustment to the existing bounding box. We will show examples below to generate this image:

We can directly adjust the size of the bounding box using size, which sets the width and height of the bounding box to the given values. These values must be non-negative, and the resulting bounding box distributes the width and height equally between the left and right, and top and bottom, respectively. Here's an example where we set the width and height to different values, and use debug to draw the resulting bounding boxes.
val circle = Picture.circle(50)

val rollingCirclesSize =
  circle
    .size(100, 25)
    .debug
    .beside(circle.size(80, 20).debug)
    .beside(circle.size(50, 15).debug)
    .beside(circle.size(20, 10).debug)
    .beside(circle.size(0, 0).debug)
To increase or decrease the existing bounding box we can use margin. This allows us to add extra space around a picture or, with a negative margin, to have a picture that overflows its bounding box. Here's an example that uses the form of margin that adjusts both the width and height of the bounding box. There are other variants that allow us to adjust the width and the height separately, or adjust all four edges independently.
val rollingCirclesMargin =
  circle
    .margin(25)
    .debug
    .beside(circle.margin(15).debug)
    .beside(circle.debug)
    .beside(circle.margin(-15).debug)
    .beside(circle.margin(-25).debug)
Implementation
The Layout algebra supports all the features described above, as does Image.